Saturday 9 June 2012

How to create an FUD Key logger (or) How to make an Key logger undetectable to antivirus:

3 comments
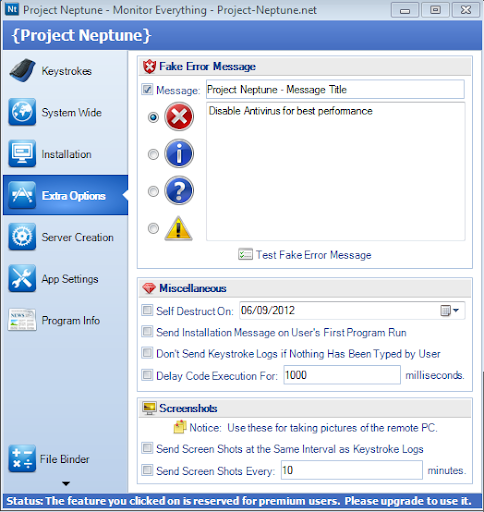
Welcome back readers, In this tutorial we are going to show how to make an undetectable key logger  to most antivirus programs (AVG,AVAST,KASPERSKY).Already we had showed you how to make an key logger in our previous tutorial, if you do not know about it first read that here

Tools required:

*Xenocode post build 2009 for .NET beta
*Hex workshop HEX editor

You can download these from this link

Step 1:Initially disable your antivirus protection (Here I am using AVG antivirus Right click on AVG and click “Temporarily disable AVG protection” and select ” Until I restart next time”


Step 2: Install  Xenocode post build 2009 for .NET beta & Hex workshop HEX editor.Also don’t forget to use the crack


Step 3: Open Xenocode post build 2009 for .NET beta from program files and go to Application tab and click  “ADD” option from that and add your keylogger file (ie, already prepared through NEPTUNE keylogger or any other)


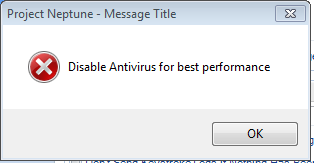
Step 4: Now go to “VIRTUALIZE” tab and click “ENABLE” check box at left side. Then go to “GENERAL” tab there. Uncheck the “INHERIT PROPERTIES” tick box at right corner. Then change the product title, publisher, description, website, version to your desired (Here I use AVG v11.3.4, AVG corporation, AVG , www.avg.com ,AVG.(Optional:If you want to change the icon click “BROWSE “ option and select the required application and automatically it will change to that app icon.)


(Optional)


Step 5:Now click “XENOCODE APPLICATION “and save it.


 Step 6: Now your keylogger file will appear as shown(With avg icon making it undetectable to victim)


Step 7: Now go to “Hex workshop HEX editor (32 bit)” from “All programs”


Step 8: click “File->open->your keylogger file


Step 9:  Press “Ctrl+F” which opens Find dialog box change type to “TEXT STRING” and search for “COPYRIGHT”


Step 10 : It will show the result as follows 


Step 11: Now select these codes as shown in fig


 Step 12: Now right click on the selected area and click “FILL” option from that,then click OK.


Step 13: Result will change all binary codes to 00 as shown 


Step 14: Then manually search for  “X.e.n.o.c.o.d.e. .V.i.r.t.u.a.l. .A.p.p.l.i.a.n.c.e. .R.u.n.t.i.m.e”(Ctrl+F feature cannot be used here, if required use Ctrl+F and search for letter X and find X.e.n.o.c.o.d.e)


Step 15: again as step 12 right click on the selected area and click “FILL” option from that, and then click OK.

Then it will look as


Step 16: click save option from File->save.


On that dialog box click Yes. Then it will be automatically saved to your key logger file.

Step 17:Turn back the antivirus and scan that key logger file.


Hurrah  Yes you made it ,an undetectable key logger  !!!This file is not detected by most antivirus (AVG,AVST,KASPERSKY)which is used by most of our friends. You cancheck it through online scanners as shown 


Now send that keylogger file to your victim which would not be detected by his antivirus.
If you have any clarifications comment on these post and we will try to solve it at best


Stay tuned at science404error.blogspot.in for more upcoming tutorials , Click like on our Facebook page 


Continue reading →

Hacking friends PC using Neptune keylogger

2 comments
Hi friends today we will show you how to hack an friend's PC using an key logger.Key logger are the set of codes which can be used to record the keystrokes of PC by directly stealing the input from Kernel. In this tutorial we will show you how to make an Key logger file using a revolutionary software PROJECT NEPTUNE V1.78 key logger which is available as both freeware & shareware.

Step 1:Download this Neptune key logger from any of these links


Step 2: open Project Neptune v1.78 from the downloaded files


Step 3: In email settings enter your email id in “ENTER EMAIL TO SEND KEYSTROKE LOGS”(this id should be your "fake id" since generally email service providers recognize them as spam and delete them in 7 days)


Step 4: Provide your password in “SENDING EMAIL ACCOUNTS PASSWORD”


Step 5: provide your same email ID or different ID where you want to receive (ex:science404error@gmail.com)

Also if you have known about FTP and have a FTP account you can use that too.


Step 6 (optional): If you want to disable mouse clicking /Internet explorer/Registry commands/Run dialog box/Task manger you can do that through going to “SYSTEM WIDE “ tab and checking the necessary check boxes. You can also prevent user from accessing specific websites (ex :any online scanners)


Step 7: In Installation tab you can specify the directory where your key logger is going to RUN on your friends PC .It is best to select “system Files Folder-C:\windows\system32”


Step 8(optional): Using “EXTRA OPTIONS” tab you can display an fake error messages like “Disable Antivirus for best performance”. Also using this tab we can destroy our own key logger files after certain period of time.


During execution the error message will be displayed as


Step 9:The most important step in this process is server creation which needs bit logic .Go to “Server creation”  tab on server settings type the required  description ,Company,Copyright. for ex
Description: windows security alert
Company: Microsoft
Copyright: Microsoft Corporation

You can provide anything but it must be "doubtless" in regarding because these details will be displayed at task manager during execution

Step 10: Next on “server generation” provide any name to your key logger file (ex:iexplorer.exe) on “SET SERVER NAME’S PROCESS AS”


Step 11: Click on “GENERATE NEW SERVER” and save it to desired location.whoa ! you created an keylogger now send that file to victim.


 NOTE: these .exe files are easily detectable and cannot be send by gmail, for this purpose try to compile it with any of other games or word documents and send it to your victim.
If you have any clarifications comment on these post and we will try to solve it at best


Stay tuned at science404error.blogspot.in for more upcoming tutorials, Click like on our Facebook page
Continue reading →
Friday 8 June 2012

All Nokia Master Reset Codes

1 comments


Nokia Codes :
*#0000#
- SW version

Nokia Codes : *#06#
- Check IMEI

Nokia Codes : *#war0anty#
- SIMLOCK info

Nokia Codes : *3370#
- Enhanced Full Rate ON

Nokia Codes : #3370#
- Enhanced Full Rate OFF

Nokia Codes : *4720#
- Alternative sound quality codec ON

Nokia Codes : #4720#
- Alternative sound quality codec OFF

Nokia Codes : *#7780#
- Default factory settings (Hard Reset)

Nokia Codes : *#7760#
- Production serial number

Nokia Codes : *#2820#
- Bluetooth info

Nokia Codes : *#73#
- Reset phone timers and game scores.

Nokia Codes : *#7370925538#
- Delete all the content of the wallet and the wallet code.

Nokia Codes : *#7370#
- Soft Reset/Format - erases all telephone memory.

Nokia Codes : [Green]*3
- Hard Reset/Format - if only the telephone memory is formatted, puts back the attitudes and reboots

Nokia Codes : *#delset#
- MMS/GPRS settings removal
Simlock info: * # 9 2 7 0 2 6 8 9 #

Provider lock status: # p w + 1 2 3 4 5 6 7 8 9 0 + 1

Network lock status: # p w + 1 2 3 4 5 6 7 8 9 0 + 2

Provider lock status: # p w + 1 2 3 4 5 6 7 8 9 0 + 3

SimCard lock status: # p w + 1 2 3 4 5 6 7 8 9 0 + 4

1234567890 - Master Code which is generated from IMEI

NOKIA E65 Secret Codes

*#06#
To check the IMEI.

*#0000#
To check the firmware version and date.

*#92702689# *#war0anty#
To check the IMEI. The date when it was purchased, and the date when it was repaired.

*4720# (*hra0#)
To activates the Half Rate.

#4720# (#hra0#)
To deactivates Half Rate.

*3370# (*efr0#)
To activates Enhanced Full Rate.

#3370# (#efr0#)
To deactivates Enhanced Full Rate.

*#746085685# (*#sim0clock#)
To check the SIM clock status.

*#7220# (*#pca0#)
To activate the GPRS and Packet Common Control Channel(PCCCH) supports.

*#7230# (*#pcd0#)
To deactivate the GPRS and Packet common control channel (PCCCH)supports.
Continue reading →

Creating a phishing page(Gmail & facebook)

1 comments
In this article i am going to teach you how to set up the Phishing site, which is the Difficult task than making a Phishing site.

Step 1: The First Step in Making the site is to regester an account at http://www.000webhost.com/order.php (if you have account than you can skip first 2 steps)


Step 2: Now Goto your email account that you gave and confirm your account with confirmation link


Step 3: Now Download this  FILE
use any one at a time.

Step 4: Now Goto http://members.000webhost.com/ and Log into your account.

Step 5: Now when you are logged into your account click on the Go to Cpanel  in front of your domain that you had registered, and then Go to File Manager under Files and log into it.

Step 6: Now Click on the Public_html.


Step 7: Now click on the Upload button, choose the file under the Archives that you have downloaded, to be uploaded.

Step 7: Now any one who visits your site would be taken to the Fake Facebook Login Page. After they enter their Username and Password, they will be taken to another page that will show them error. So there is less chance that it will be detected. 


NOTE::: To access the input data ( Usernames and Password ) Goto the Following Address:


http://www.yoursitesadress.p4o.net/lol.html


If I am not clear in any point Please ask me in comments below.
THE DOWNLOAD LINK TO facebook.zip is 
http://www.mediafire.com/?klq1vak76bouzrw 
PS:> If www.p4o.net didn't worked for you, you can use :
www.drivehq.com
www.yourfreehosting.net
www.esmartstart.com

=============================================================
The Input Data (Email and Password) will look like following:
==============================================================
UPDATE:
Now if you have successfully made the Phishing page(site) then you must know that on Facebook you cannot post it, mail it, or sent it in chat. e.g: www.yoursite.p4o.net. This is because Facebook dont allow the T35.com sites. So Solution to this problem is to use http://www.dot.tk for the URL hiding.
All you have to do is to Goto http://www.dot.tk , on the main page enter your Phishers address and get a domain for that. Like for www.myphisher.p4o.net you gets www.myphisher.tk. And facebook will allow you to post it

HOW TO FIND YOUR USERNAME?
Ok guys this is the most asked question of all so here is a simple answer, just look in the following picture of Admin Paned the red shaded area tells you the username of the website
Continue reading →
Wednesday 6 June 2012

How do I delete updates not yet installed?

0 comments

Remove WU downloads from the temporary folder:-

Stop the Automatic Updates service

Click Start, Choose Run.
In the Run box, type services.msc.
Click OK.
Right-click the Automatic Updates service.
Click Stop.
Stopping the service will take a moment.

Delete the contents of the Download folder
Click Start. Choose Run.
In the Run box, type %windir%\SoftwareDistribution
Click OK.
Open the Download folder.
Delete all contents of the Download folder.
Close the window.

Start the Automatic Updates service
Click Start. Choose Run.
In the Run box, type services.msc.
Click OK.
Right-click the Automatic Updates service.
Click Start.
Starting the service will take a moment.

By deleting the contents of the Download folder - you have removed any downloaded updates.

Continue reading →

Searching millions of flash games online using google (direct download)

0 comments

Another google trick, this can be used to search any flash games(swf files) you want to play.
So you just played a flash game which was really cool and you want to download it in your computer? You can use google's search trick to search for any flash game you want.
This trick relies on the way directory listing is done in the webserver's directories. Whenever the default index page or directory listing denying features are not implemented in the web server, we can view the files in the directory. I'm not going into the further detail of this, instead I'm going to show you how to perform the google search for finding whatever flash game you want.
Continue reading →
Monday 4 June 2012

How to Hide text behind images ?

0 comments


How to Hide text behind images ? (Steganography)


Steganography is the art of hiding text data's behind an image so as to maintain an privacy and to store/pass confidential data's in an ease. Using this method we can hide any text files behind an image through similar method we can also hide an .rar files behind it
Continue reading →

How to make RUN command for any shortcut

0 comments


  • In this tutorial we will show you how to create RUN commands.In our daily day to day to life we use various run commands for different purpose what would be if we create RUN commands for our folders which would easily open on typing an command.This will help you to create RUN commands similar to winword,regedit,sendto,cmd,calc etc
  • Continue reading →
    Saturday 2 June 2012

    How to make an autorun.inf file

    0 comments

    In this tutorial we will show how to create autorun.inf file which will be helpful to make autorun CD and also will play an important role to open keylogger files automatically.Open Notepad (or Notepad++ or what ever you use) and type the following:


    autorun
    icon=NAME.ico
    label=NAME

    BEFORE YOU SAVE IT!
    Where it says autorun, insert brackets around the word. I cannot type this in the Instructable, as it the Instructable creating software would turn the word into a link. Refer to the picture for the correct format.

    Here is what you typed:
    autorun: This states that this is an Autorun file, and what follows describes what the drive will look like and how it will act.

    icon: This will change the icon of the drive (in the "My Computer" screen) to a custom one that you choose. The picture you choose must be an icon file (it must have the extension ".ico"). You can get pictures of that format from http://www.iconarchive.com/ and many other websites.

    label: This will change the name of the drive to whatever you choose, as long as what you choose does not contain too many characters.

    OK. Save the file to the main directory on your drive ("My Computer, Removable Drive X"). Eject the drive, then plug it back in. If you saved it to an internal hard drive, you will have to restart the computer.

    If you are adding an icon to the drive, you will need to have an icon file to go use. An icon file is NOT a picture you got off the internet. It must have the extension ".ico". If it does not, then it will not work. Place the icon in the same directory as the Autorun file. Once you have done this, go back into the Autorun file and change the line that says icon=NAME.ico to have the name of the icon (keep the part that has the ".ico".
    Continue reading →

    How to block Web Sites without any Softwares

    0 comments
    In this tutorial we are going to show
     you how to block any websites without
     any softwares in your PC.In this method 
    we are directly going to move to HOST server and will block this websites also in viceversa we can also UNBLOCK any websites on your PC at office,schools etc.,


    1] Browse C:\WINDOWS\system32\drivers\etc 

    2] Find the file named "HOSTS" 

    3] Open it in notepad 

    4] Under "127.0.0.1 localhost" Add 127.0.0.2 www.anywebsite.com , and that site will no longer be accessable. 

    5] Done! 


    -So- 

    127.0.0.1 localhost 

    127.0.0.2 www.anywebsie.com 


    www.anywebsite.com is now unaccessable


    For every site after that you want to add, just add "1" to the last number in the internal ip (127.0.0.2) and then the addy like before. 


    IE:

    127.0.0.3 sms chat 

    127.0.0.4 sms chat 

    127.0.0.5 sms chat 
    Continue reading →

    Add Copy To And Move To Options Whenever U Right Click On A File

    0 comments


    Once done, you will be able to right click any file or folder and use the Browse for Folder dialog to choose the location you want to move or copy your file or folder to, without having to go to the destination path, its cool!


    First we will add the copy and move options to the right click menu of all FILES.

    CLICK Start>Run, type REGEDIT and click OK to open up the registry editor and make your way to this key:

    HKEY_CLASSES_ROOT\*\shellex\ContextMenuHandlers

    Right click the ContextMenuHandlers key and choose New>Key.
    Name the new key “Copy To” (without the quotes).
    Repeat the above and create another new key named Move To.

    You should now have two new subkeys under the ContextMenuHandlers key:

    HKEY_CLASSES_ROOT\*\shellex\ContextMenuHandlers\Copy To
    HKEY_CLASSES_ROOT\*\shellex\ContextMenuHandlers\Move To

    Select the Copy To key and in the right hand pane, double click “Default”
    Enter this clsid value as the value data:

    {C2FBB630-2971-11d1-A18C-00C04FD75D13}

    Next , select the Move To key and in the right hand pane set the default value to:

    {C2FBB631-2971-11d1-A18C-00C04FD75D13}

    This now takes care of the Copy and Move options for the right click context menu of all your files.
    Now all that is left is to add the same options to the right click menu of all your folders.
    The procedure will be the same as for files but at a different key:

    HKEY_CLASSES_ROOT\Directory\shellex\ContextMenuHan dlers

    Right click ContextMenuHandlers and create a new key named Copy To.
    Right click it again and create another new key named Move To.

    left click on the right hand pane, add the same default values as you did for Files:

    For Copy To:
    {C2FBB630-2971-11d1-A18C-00C04FD75D13}
    For the Move To:
    {C2FBB631-2971-11d1-A18C-00C04FD75D13}

    Exit the registry and you are done.

    Now when you right click on a file or folder, you should see two new options: Copy to Folder and Move to Folder
    Continue reading →

    Labels